
How Do You Remove Natural Grass and Prepare the Ground for Artificial Turf in Burke, VA? What Homeowners Need to Know About Base Prep
Proper ground preparation is the single most important step in any artificial turf installation — and it’s also the step that most competitors barely discuss. If you’re planning a turf project in Burke, VA, here’s the honest answer: the turf itself is almost secondary to what happens underneath it. A mediocre turf product installed on a well-engineered base will outlast a premium turf product laid over a rushed or improper sub-base every single time. After more than 12 years installing turf across Fairfax County and the broader DMV area, that statement has never been wrong.
What follows is a straight technical walkthrough of what real ground preparation involves — from sod removal through final compaction — and what you should be asking any installer before they touch your yard.
Why Base Prep Is the Part of Turf Installation Nobody Talks About Enough
Browse most competitor sites in the Northern Virginia market and you’ll find plenty of content about pile heights, fiber types, and color choices. What you won’t find is a detailed explanation of what happens between tearing out your existing lawn and rolling out the turf. That gap isn’t accidental — base prep is unglamorous, labor-intensive, and expensive to do correctly. It’s also the difference between a surface that drains properly through a Burke, VA spring rainstorm and one that turns into a swamp by April.
Northern Virginia’s clay-heavy soils compound this problem significantly. Unlike sandy coastal soils that drain naturally, the red-orange clay common in Fairfax County and much of Prince William County holds water like a bowl. Install turf over native clay without engineering the drainage layer, and you’ve essentially built a bathtub with fake grass on top.
Step One: Sod and Vegetation Removal
The process starts with removing everything growing in the installation area. For most residential backyard projects in neighborhoods like Burke Centre, Rolling Valley, or Signal Hill, that means mechanically cutting and stripping the existing sod to a depth of roughly 3 to 4 inches. This depth matters because you need to remove not just the grass, but the thatch layer and the first layer of organic topsoil. Organic material compresses, decomposes, and shifts over time — none of which you want happening under a surface that’s supposed to stay perfectly flat for 15 to 20 years.
Smaller yards in townhome communities — common throughout Springfield and West Springfield — often require manual removal with sod cutters rather than machinery, because there’s no access for a skid steer or mini excavator. This takes longer and costs more in labor, but skipping it isn’t an option. Any competent installer accounts for access constraints during the initial site evaluation.
Herbicide treatment of the stripped soil is an optional but often recommended step, particularly in areas with persistent weeds like nutsedge or crabgrass. A single application of a non-selective herbicide after stripping — applied to the exposed native soil before base material goes down — dramatically reduces the chance of anything pushing through the weed barrier later.
Step Two: Excavation, Grading, and Slope Engineering
Once vegetation is out, the native soil needs to be graded. This isn’t just about making things look level — it’s about engineering water movement. Every turf installation needs a minimum 1% slope away from structures like your house foundation, fence line, or hardscape border. In a yard that’s already relatively flat, that sometimes means cutting into the native soil to create directional drainage rather than relying on the existing grade.
In practice, this step often reveals problems that weren’t visible when the yard was grassed — low spots that hold water, areas where previous landscaping disrupted the natural grade, or soil that’s been disturbed by tree roots or old irrigation lines. Finding these problems before the base goes in is a good thing. Finding them after is expensive.
Step Three: The Crushed Aggregate Sub-Base — Where Most Cheap Installations Fail
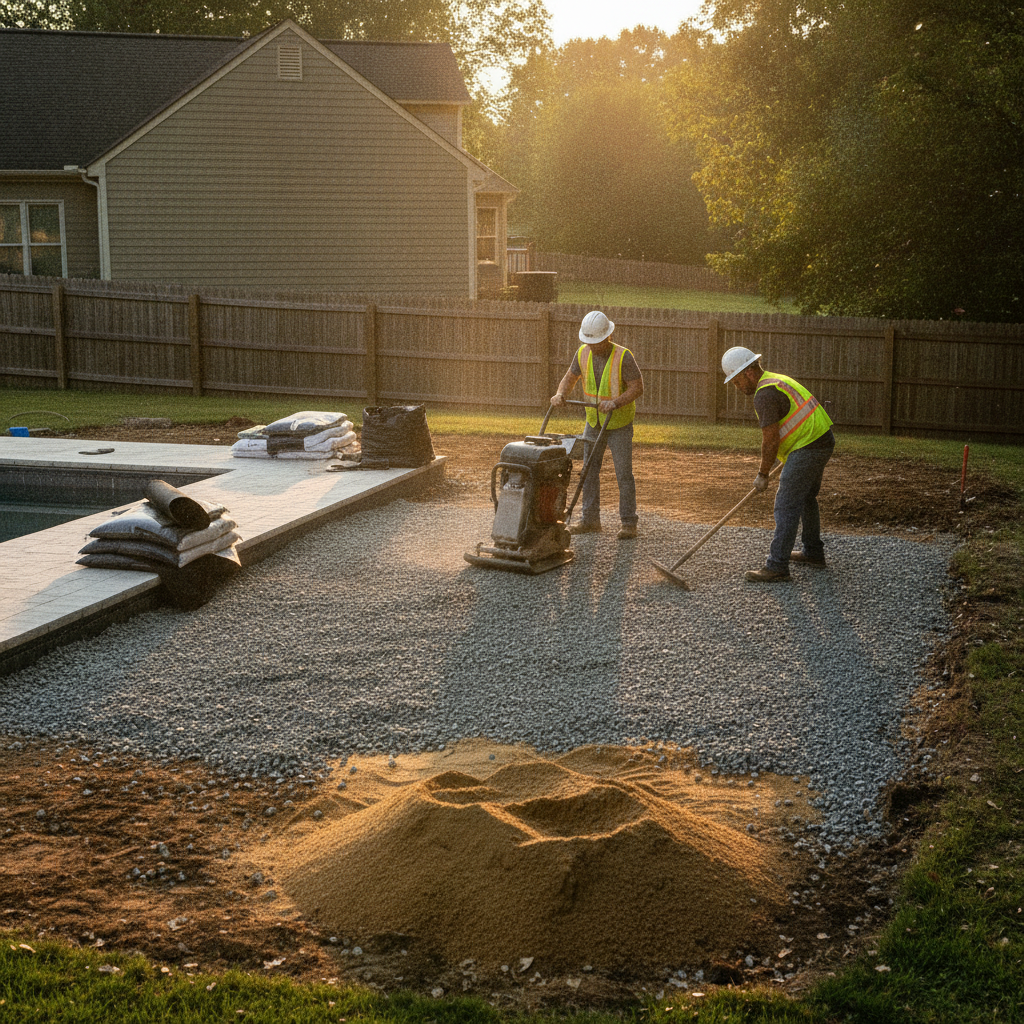
This is the technical core of the entire installation, and it’s where the biggest differences between quality installers and budget operators show up. After excavation, the installation area is filled with a layer of crushed miscellaneous base (CMB) or decomposed granite — typically 3 to 4 inches deep for residential lawns, up to 6 inches for heavier-use applications. CMB compacts tightly while still allowing water to move through it at high rates. It doesn’t shift, settle, or compress the way organic material does.
The base is laid in lifts — usually two passes — and compacted with a plate compactor between each lift. Final compaction brings the material to 95% Proctor density, which is the engineering standard for a stable base that won’t develop depressions or soft spots over time. If an installer doesn’t mention compaction rates or runs only a single pass with a plate compactor, that’s a red flag.
For pet turf applications specifically, some installations include a secondary drainage layer of washed angular aggregate beneath the CMB to further accelerate vertical water movement. Grassify’s pet-friendly turf installations incorporate a 5-layer drainage system engineered to move water at 400+ inches per hour — well beyond what any DMV rainstorm will throw at it.
Step Four: Weed Barrier Installation
Over the compacted base goes a commercial-grade, non-woven geotextile weed barrier. The critical word there is non-woven — woven barriers are permeable but allow fine particles to migrate through them over time, which eventually clogs the drainage layer. Non-woven geotextile allows water to pass freely while blocking root penetration and particle migration.
Barrier sheets are overlapped by a minimum of 6 inches at seams and secured at edges. This isn’t something you want to cut corners on — a poorly lapped barrier that separates over winter freeze-thaw cycles creates channels where weeds can eventually push through. Fairfax County’s cold winters aren’t severe by northern standards, but enough freeze-thaw cycles over 10 years will find any weakness in a weed barrier installation.
Step Five: Final Grade Check and Turf Layout
Before turf rolls out, the compacted base gets a final grade check — typically with a laser level on larger installations, a string line on smaller residential ones. Any low spots get filled and re-compacted. High spots get shaved down. The goal is a surface that’s both structurally stable and geometrically correct, so the turf sits flat without ripples, bubbles, or visible seams.
Turf rolls are then positioned with pile direction oriented away from the primary viewing angle — usually toward the house rather than away from it — to maximize the natural light reflection that makes synthetic grass look realistic. For residential lawns in areas like Fairfax and surrounding Fairfax County neighborhoods, pile orientation is a small detail that makes a noticeable difference in finished appearance. Learn more about what goes into a full residential turf installation from start to finish.
What to Ask Any Installer Before Signing a Contract
- How deep will you excavate, and what base material are you using? Any answer that doesn’t include crushed aggregate and a specific depth in inches is a concern.
- How many compaction passes do you run, and what compaction standard do you target? A serious installer knows and answers this without hesitation.
- What weed barrier spec are you using — woven or non-woven? Non-woven is correct for turf applications.
- What’s your drainage engineering approach given my specific yard grade and soil type? If they haven’t evaluated your soil, they can’t answer this correctly.
- What warranty do you carry on base prep and seams? Grassify backs installations with a lifetime warranty on seams, edges, and base integrity.
The Real Cost of Skipping Proper Base Prep
Homeowners sometimes get quotes that look attractive until you ask what’s included. A base prep shortcut — say, 2 inches of base instead of 4, or no compaction between lifts — might save $1.50 to $2.00 per square foot on the front end. On a 500-square-foot backyard, that’s $750 to $1,000 in apparent savings. But a base that develops low spots, drains poorly, or allows weed penetration within three to five years means tearing out the turf, re-engineering the base, and reinstalling — a cost that runs multiples of what was saved. Proper base prep done right the first time is the most cost-effective decision you can make on a turf project.
Typical all-in installation pricing in Fairfax County — including excavation, base material, weed barrier, and turf — runs between $12 and $25 per square foot depending on application type, site conditions, access complexity, and turf product selected.
Frequently Asked Questions About Turf Base Prep in Burke, VA
Can you install artificial turf directly over existing soil without removing the grass?
No. Installing turf over existing vegetation leads to decomposition beneath the surface, which causes uneven settling, odor issues, and drainage failure. Proper sod removal and excavation are non-negotiable for a lasting installation.
How do Fairfax County’s clay soils affect base prep requirements?
Clay soils drain poorly and expand and contract with moisture changes, which stresses a turf base over time. Proper CMB installation and grading are especially important in Northern Virginia specifically because of the clay content in native soils. Some installations also benefit from a French drain or perforated pipe system integrated into the base layer.
How long does base prep take for a typical residential backyard?
For an average residential backyard of 400–800 square feet with reasonable site access, base prep typically takes one full day — sometimes two if significant grading or access challenges are involved. The turf installation itself goes faster; the base prep is where the time is.
Does a weed barrier under turf actually work long-term?
When installed correctly with proper overlap, the right material spec, and secure edge anchoring, yes — commercial-grade non-woven geotextile effectively blocks weed penetration for the life of the turf. Cheap woven barriers or fabric that separates at seams are where weed problems originate.
Will freeze-thaw cycles in Northern Virginia damage a properly prepared turf base?
A correctly compacted CMB base handles freeze-thaw cycling well because it doesn’t hold water — it drains it. Bases that fail in cold weather almost always do so because of incomplete compaction or organic material left in the sub-base, not because of the freeze-thaw cycles themselves.
Get Your Turf Base Done Right the First Time
If you’re planning a turf project in Burke, VA or anywhere across Fairfax County, the conversation about ground preparation should start before you ever talk about pile height or color. Grassify has been engineering turf installations across Northern Virginia for over a decade — we’re licensed, insured, and back every installation with a lifetime warranty on seams, edges, and base integrity.
Request your free on-site consultation at grassify.us/contact-us. We’ll evaluate your site conditions, discuss your base prep requirements honestly, and give you a written scope that covers every step — not just the turf on top.


